Many tradespeople hesitate to offer gutter guard installations on box gutters with Klip-Lok® roofs, daunted by the complexity compared to other systems. However, this hesitation overlooks a significant opportunity. With their unique profiles, these roof types are more susceptible to pest infestations and ember attacks, making gutter guards not just an add-on but a necessary defence. By mastering this installation, you’re not just solving a common problem; you’re adding exceptional value to your services and giving your clients the comprehensive protection they truly need.
This guide is tailored to equip you with the skills and knowledge to provide your clients with an added layer of protection, enhancing both the functionality and aesthetic of their properties. Whether you’re dealing with the coastal homes of Sydney, the sprawling estates of Melbourne, or any structure in between, the right gutter guard solution can significantly elevate your project’s value.
Let’s dive into the various methods of fitting gutter guards to Klip-Lok® roofs and box gutters, considering factors like pitch, size, and accessibility.
How to install gutter guards to Klip-Lok® Roof & Box Gutters
- Clean and flush your box gutter systems.
- Prepare and assess your gutter system and gather the necessary tools/materials.
- Measure the box gutter and order the correct gutter mesh width.
- Measure the trim line inside the box gutter.
- Pin the gutter mesh to the box gutter wall.
- Create tags in the mesh covering.
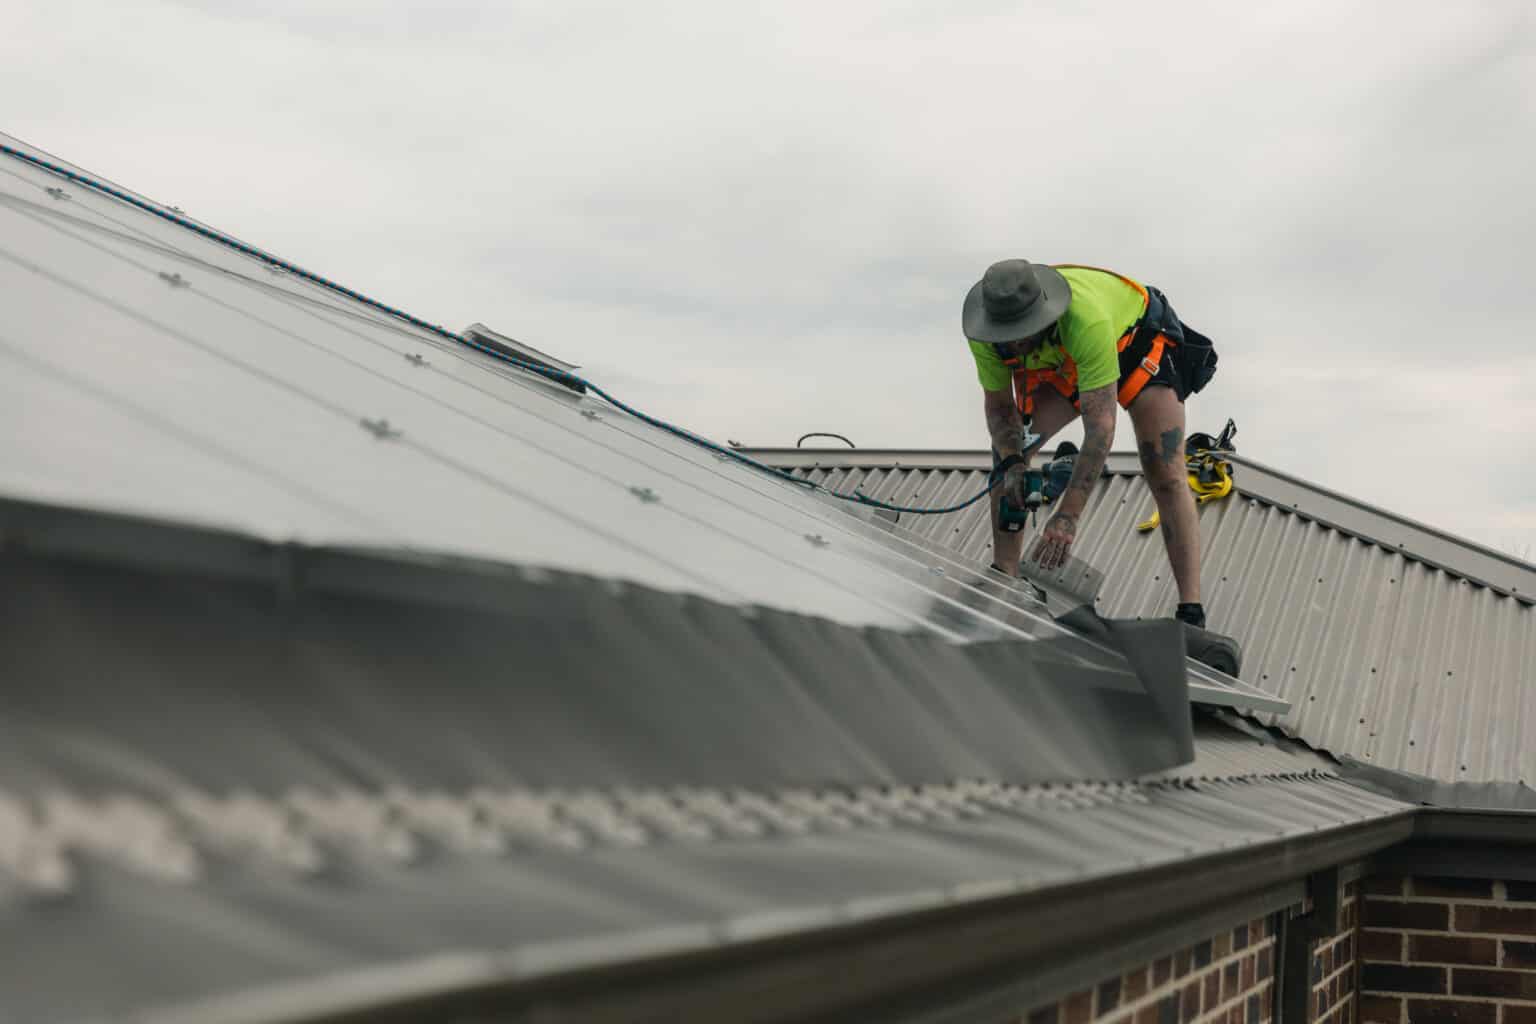
- Securing mesh to Klip-Lok® roof with clips.
Need gutter guard installed?
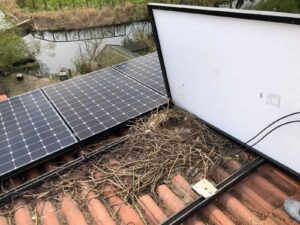
Understanding Box Gutters and Gutter Mesh
Box gutters and parapet wall fixtures are different from your standard gutter systems as they are not visible at ground level, giving your property a sleek look. Box gutter protection is effective for residential, commercial and industrial buildings. However, their higher edges and unique dimensions make the gutter mesh more susceptible to sagging and lulls, reducing the guard’s effectiveness. Installers need to understand the difference in a box gutter guard install to require specialised systems to support their weight and debris, preventing blocked gutters.
The benefits of installing gutter guards on box gutters are numerous. They:
- Prevent blockages from leaves, tree debris, and bird waste, reducing the risk of flooding and water damage.
- Provide bird-proofing, as box gutters provide optimal nesting space.
- Limit roof access to other pests, such as mice, rats and possums.
- Provide ember proofing with ember guard products, ensuring burning embers cannot ignite leaf litter inside gutters, roof valleys or spaces.
Need gutter guards installed
Preparing for Gutter Guard Installation
Before proceeding with gutter guard installation, it’s important to evaluate the condition of your box gutters. Here are the steps to follow:
- Clear any debris from the gutters.
- Flush the entire system.
- Preparing the tools
- Measuring the box gutter for mesh width and ordering materials
- If you find significant faults in the gutters, consider replacing those sections before installing.
Safety is of utmost importance in this procedure. Always comply with local and state height safety measures and use appropriate equipment such as gloves, harnesses, and ladders.
Necessary Gutter Cleaning Tools and Materials
The right tools and materials are paramount for a successful gutter guard installation. You will need:
- Safety equipment, including gloves, harness, etc
- Gutter brush
- Gutter scope
- A hosepipe
Make sure to use a lightweight aluminium extension ladder for stability and maneuverability. Work gloves that offer good grip and protection against sharp edges are also advisable.
The role of a stiff brush in the gutter guard installation process is to:
- Dislodge debris
- Thoroughly clean the gutter before installing the guard
- Ensure a clean surface for the gutter guard to adhere to
- Catch and trap debris, preventing it from entering the gutter after the guard is in place.
Preparing Gutter Guard Tools
You will need additional tools for the installation, including:
- All necessary Safety equipment
- Gutter guard kit
- Tin snips
- Electric screwdriver
- String line (works best for runs longer than 4 metres)
- Silicone
Measure the Gutter
Width Measurement
Measuring the width accurately is critical, especially with box gutters. The standard widths of 250mm and 500mm work for most kits, but precision is key for box gutters on a Klip-Lok® roof. To ensure you order the correct width, measure the distance from the box gutter wall to the roof. Add 100-150 mm where the mesh will sit on the roof and another 50mm where the mesh will sit flush up against the box gutter wall.
Length Measurement
Equally important is measuring the length of your gutter runs. This ensures you have enough mesh to cover the entire area. You can measure this from wall to wall along the gutter line. For a more tech-savvy approach, consider using satellite measuring tools like Near Maps, which provide precise aerial measurements.
Ordering Gutter Mesh
We always recommend ordering a minimum of 5 metres extra mesh beyond your measured length. This extra length accounts for any unforeseen adjustments or cuts you might need to make during installation. It’s better to have a bit more than you need than to fall short during the crucial stages of your project.
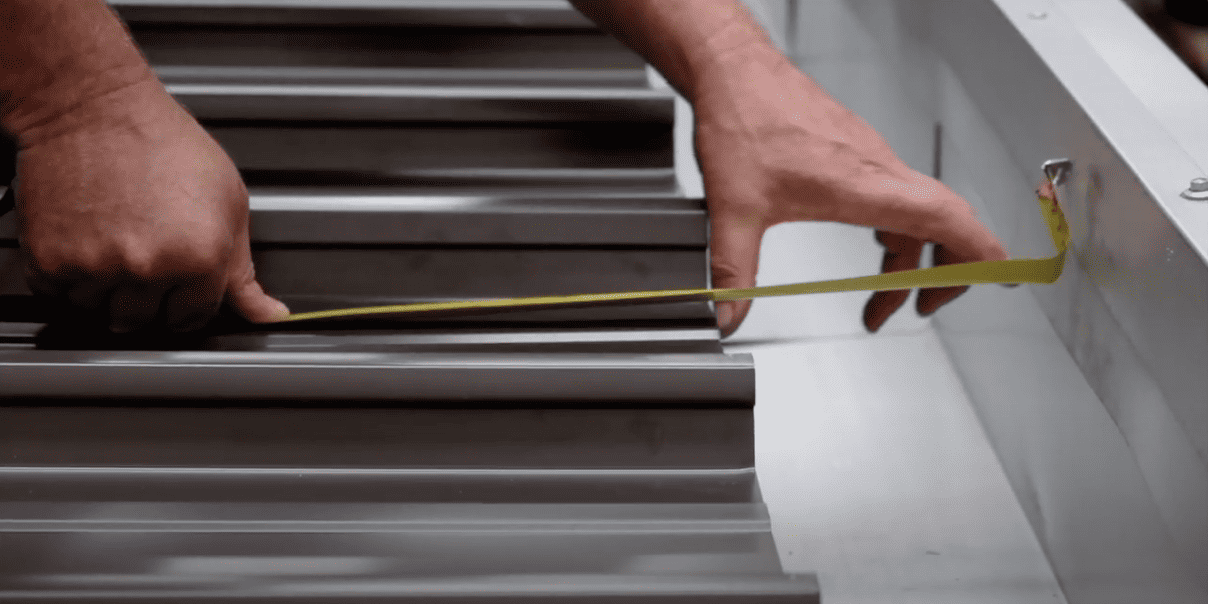
Determine the Trim Line
Measuring a straight line inside your box gutter or parapet wall is essential for a professional finish and efficiency. Place a flat trim against the roof to the box gutter and mark it on the wall. Add about 50 mm to that measurement and mark at regular intervals to give you your trim line. Continue to mark along the gutter run to ensure an even trim line.
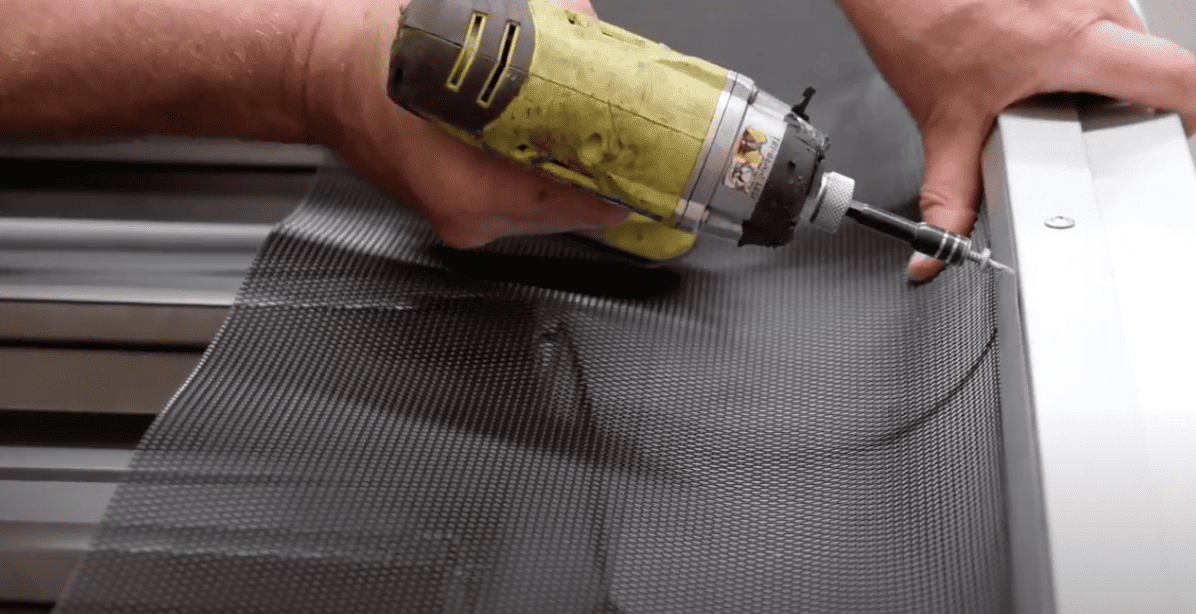
Pin the Mesh
Pin the mesh just under your trim line to provide a starting point. Secure in place with a pinning screw. This initial step is crucial for aligning the mesh correctly and ensuring it stays in place during the rest of the installation.
Secure with Trims
Once the gutter mesh is pinned, it’s time to secure it with the flat trims. Remove any pinning screws and plug the holes with the silicone. Align the trims with your earlier markings, ensuring the mesh is neatly tucked underneath. Secure the trims with neoprene screws, which ensure a waterproof seal.
Important: Before removing any screws, fill in with silicone. At the end of the installation, run a bead of silicone across the top of the trim to ensure a waterproof seal.
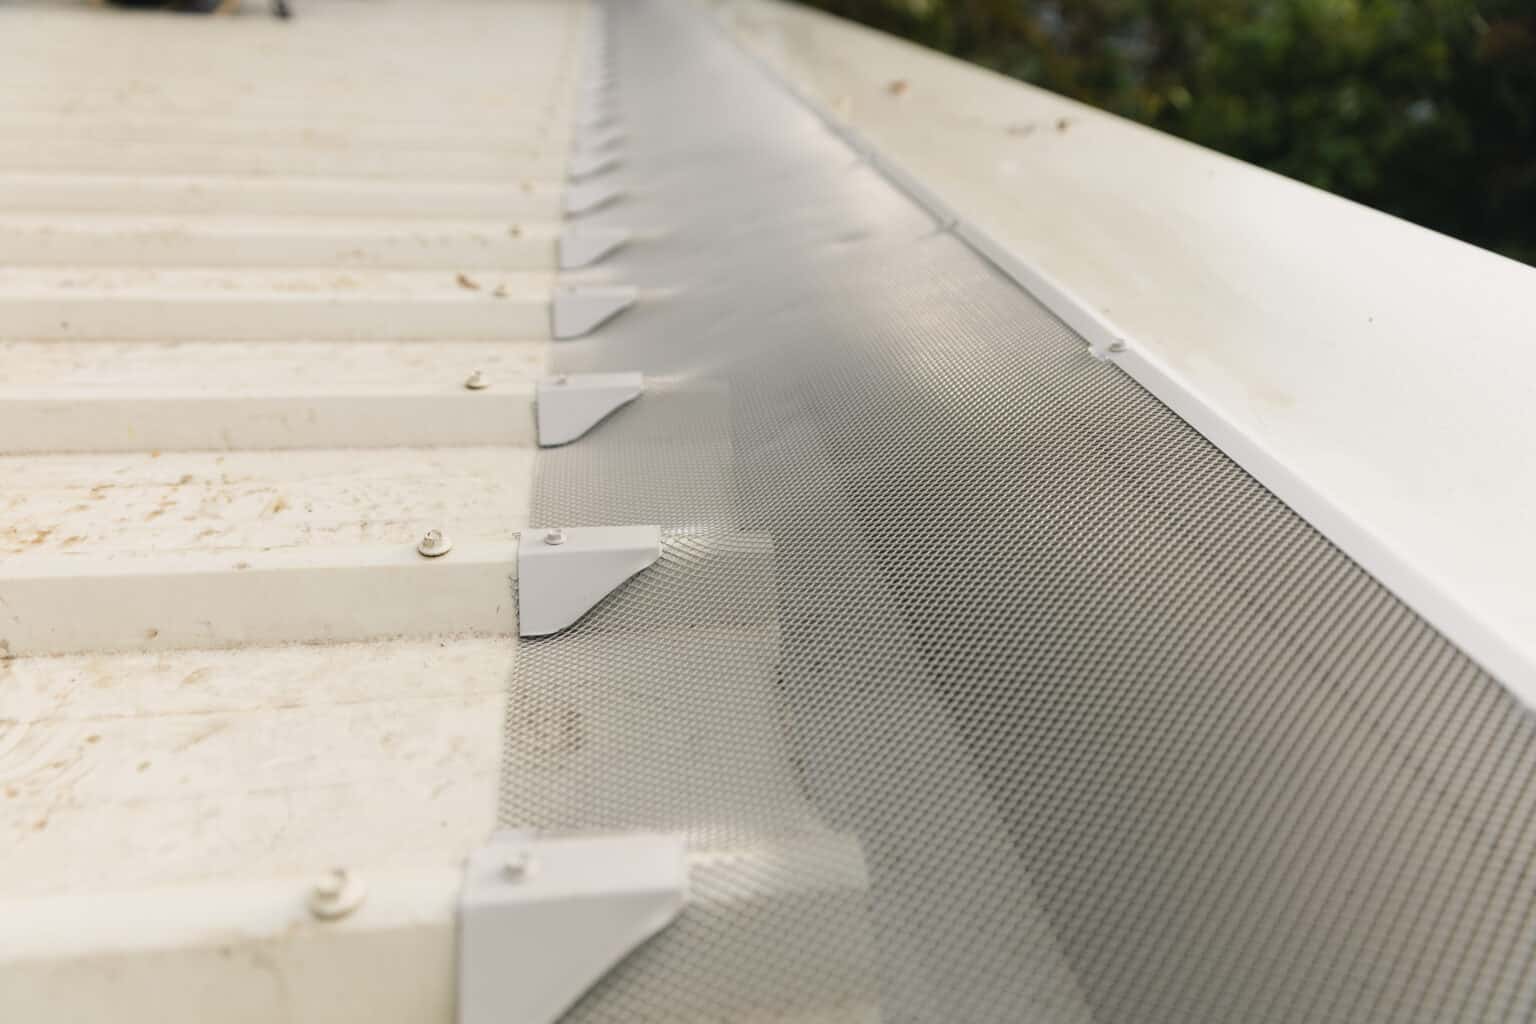
Cut the Mesh Along the Ribs
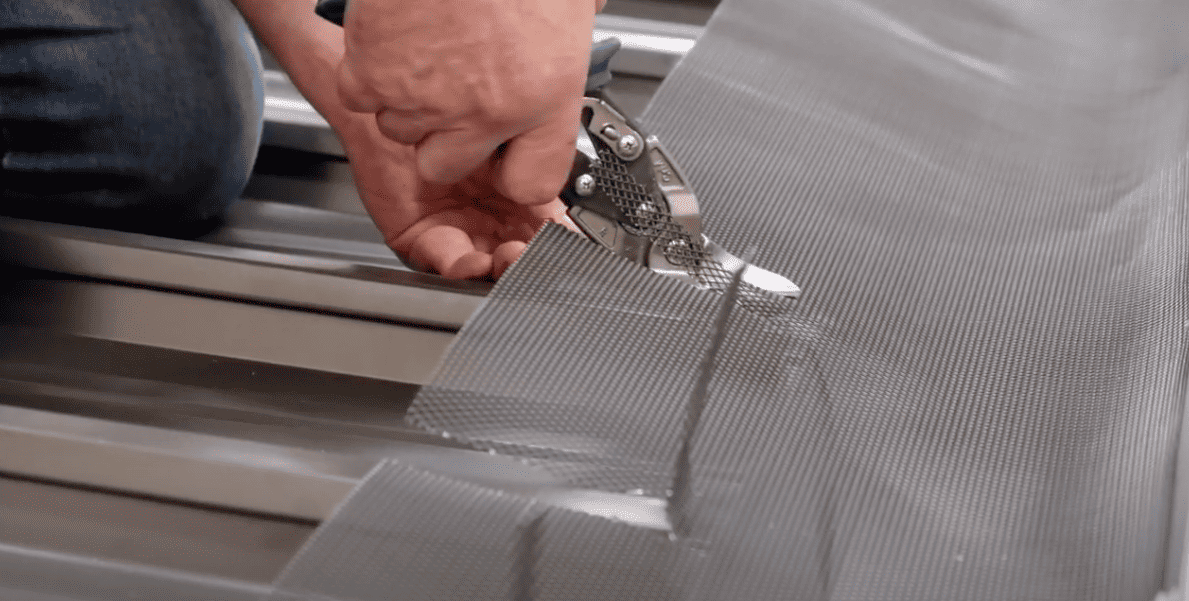
Cutting the mesh correctly is vital for a flat fit, preventing water build-up, and ensuring vermin and ember proofing. Screen Tech and our installation partners pioneered the tag method. Make two cuts down the top of each rib, stopping about 30mm from the edge, and then fan out towards the end, creating a flush tag with the roof pan.
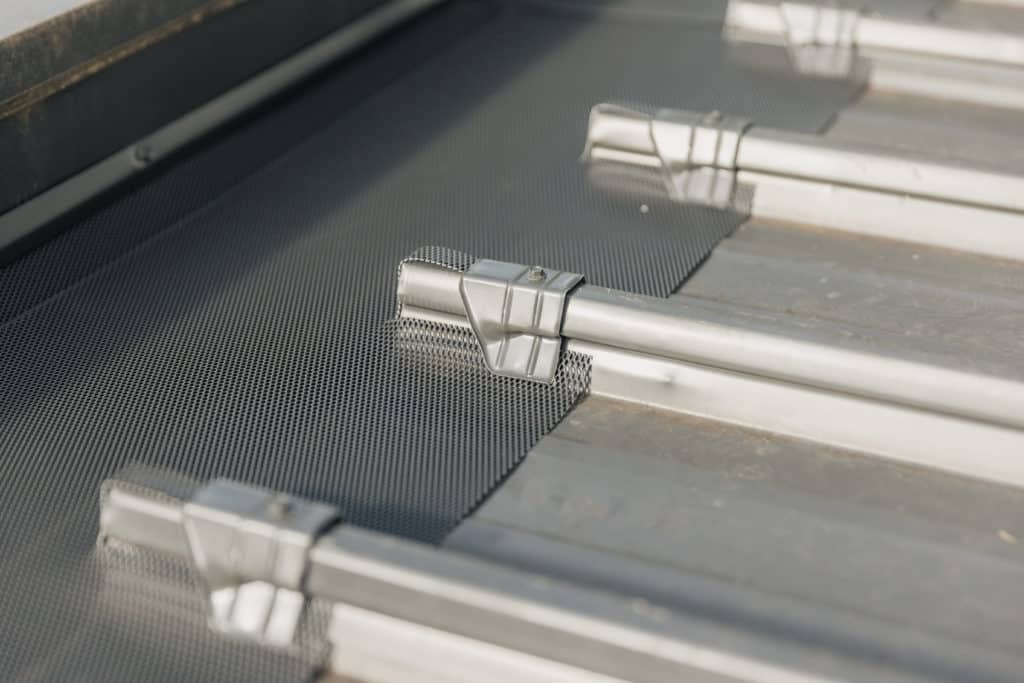
Seal the Gutter Mesh with Clips
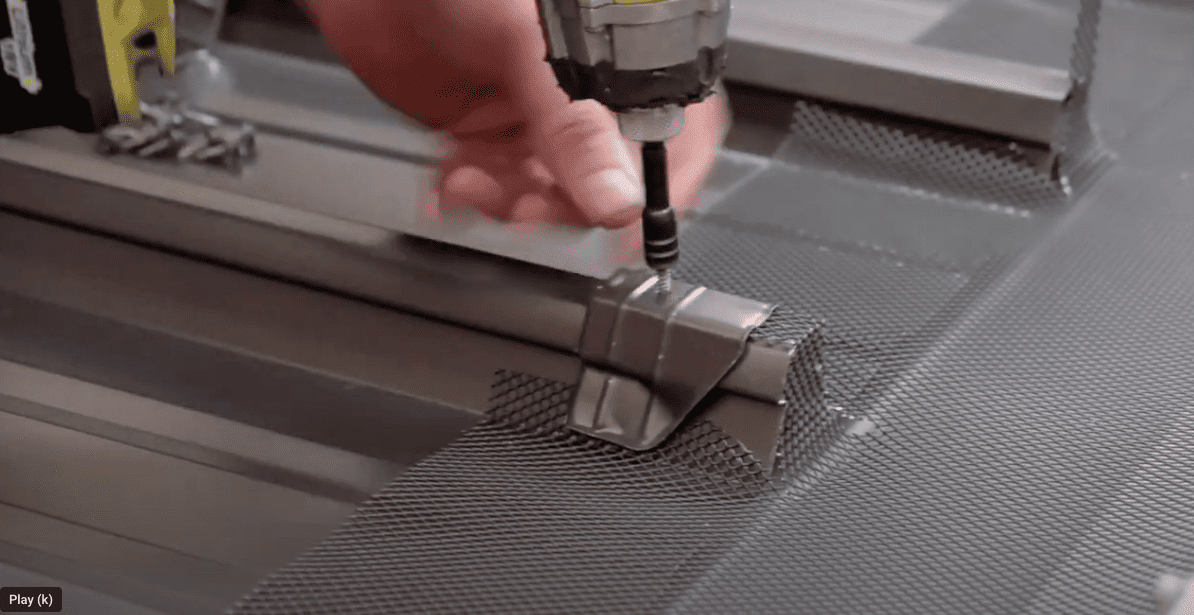
The final step is securing everything with clips. These clips play a crucial role in holding down the tags and ensuring a watertight seal. Align the screw hole with the mesh to strengthen the tag, then snap the clip into place.
Secure with a roofing screw; neoprene washer screws are not necessary as the clips provide a watertight seal.
Finalising the Gutter Guard System
With the gutter guards securely installed, it’s time to complete the gutter guard system installation. This involves ensuring proper water flow and achieving an aesthetically pleasing finish.
Ensuring Proper Water Flow
Maintaining proper water flow is vital for efficiently operating your gutter guard system. After installation, follow these steps to ensure proper water flow:
- Remove any loose debris from the gutters.
- Flush the gutters with water to test the flow.
- Observe if the water flows smoothly towards the downpipes.
- Check the underside of the gutters for any leaks or dripping water.
By following these steps, you can ensure that your gutter guard system is working effectively.
If you notice any water flow issues, it’s important to address them promptly. Here are some steps you can take:
- Adjust the positioning of the gutter guards if needed.
- Clear any debris blocking the gutter or downspout.
Need gutter guards installed
Adapting the Process to a Parapet Wall
Installing gutter guards on parapet walls closely mirrors that of box gutters on Klip-Lok® roofs. The key principles of accurate measurement, secure pinning, precise cutting, and thorough sealing also apply here. For parapet walls, ensure that your measurements for width and length are exact, taking into account any unique contours or features of the wall. When pinning the mesh and fitting the trims, pay special attention to the alignment against the parapet wall, ensuring a snug fit that prevents debris accumulation and water ingress.
The final inspection is crucial to ensure that the gutter guard system is not only effectively installed but also complements the aesthetic of the parapet wall while offering robust gutter protection.
Selecting the Right Gutter Guards for Your Roof Type
Your roof type can significantly dictate the kind of gutter guard products appropriate for installation. Whether you have a:
- Metal roof (Trimdek®, Klip-Lok® or corrugated roofs)
- Slate roof
- Flat roof
- Asphalt roof
- Terracotta tiled roof
- Tiled roof
It’s crucial to choose a gutter guard that is compatible with your specific roof type.
Compatibility with Metal Roof
For a metal roof, ensure the compatibility of your chosen gutter guards with the roof material. Using incompatible gutter guards can result in galvanic corrosion due to contact between different metals, which can weaken your roof and potentially cause leaks or damage.
When selecting gutter guards for metal roofs, consider the following factors:
- The type of roofing system
- The specific gutter guard product material
- Design
- Installation complexities
- Higher edges
- Maintenance requirements
Klip-Lok® Roof Compatibility
Specialised gutter guards like the Klip-Lok® box gutter guard kits with custom clips are designed to offer a precise fit for specific metal roofing systems, ensuring compatibility and aesthetics. Screen Tech’s Supadek clip for Klip-Lok® roofs is also suitable for Lysaght® Klip-Lok®, Hi-Strength Lysaght® Klip-Lok, ® 406 Lysaght® Klip-Lok®, Classic Fielders KingKlip®, Metroll Metlok®, Revolution Revklip Stramit and Speed Deck Ultra®.
For Trimdek® or Spandek® roofs, see our Trimdek® gutter guard kits with custom clips.
Want to install our gutter guard?
Common Installation Mistakes and Their Solutions
Mistake 1: Incorrect Measurement
- Problem: One of the most frequent errors is incorrectly measuring the gutter’s width and length. This can lead to inadequate coverage or excess material.
- Solution: Always double-check measurements before ordering. For width, include additional space for the mesh to sit comfortably on the roof and against the box gutter wall. For length, use precise tools or digital measurement aids like Near Maps for accuracy.
Mistake 2: Inadequate Securing of Mesh
- Problem: Please secure the mesh properly to avoid it sagging or detaching, especially in adverse weather conditions.
- Solution: Ensure the mesh is firmly pinned at the start of the installation. When securing with trims, use silicone to plug any holes created by the removal of pinning screws, and align trims accurately with earlier markings.
Mistake 3: Overlooking the Importance of Trim Line
- Problem: An uneven trim line can lead to poor aesthetics and functional issues in water flow and debris collection.
- Solution: Use a flat trim to mark a straight line inside the box gutter or along the parapet wall. Ensure consistent marking at regular intervals along the gutter run for an even and effective trim line.
Mistake 4: Incorrect Cutting of Mesh
- Problem: Improper cutting technique can lead to ineffective sealing, leaving room for debris accumulation and water pooling.
- Solution: Adopt the ‘tag method’ pioneered by Screen Tech. Make two straight cuts along each rib, stopping short before the edge, then fan out to create a tag. This ensures a flat fit and effective vermin and ember proofing.
Mistake 5: Failing to Seal Screw Holes Properly
- Problem: One common oversight is neglecting to fill screw holes, which can lead to leaks and potential water damage.
- Solution: Whenever you remove or reposition screws during installation, it’s crucial to fill these holes with silicone immediately. This applies both to the initial pinning screws and any adjustments made during the fitting of trims. Ensuring all screw holes are properly sealed not only prevents water ingress but also maintains the structural integrity of the roof and gutter system. A thorough final check for unsealed holes is essential for a professional and reliable installation.
By being aware of these common pitfalls and their solutions, you can ensure a more efficient and reliable installation, reinforcing your reputation as a skilled and knowledgeable professional in this field.
Maintenance and Longevity
The beauty of the gutter protection system is that it requires minimal maintenance once it is installed and offers a unique selling point for your customers. Here are some maintenance and longevity points you can share with your customers:
- Importance of Regular Maintenance: Regular maintenance is crucial to maximise the lifespan and effectiveness of gutter guards. Even the best-installed gutter guards can accumulate debris over time, which may affect their performance.
- Schedule Regular Checks: It’s advisable to inspect gutter guards at least once a year – typically in spring and/or autumn when debris accumulation is likely to be highest.
- Cleaning Process: Use a soft brush or blower to remove any debris sitting on top of the guards. Ensure that downspouts are straightforward to maintain proper water flow.
Regular maintenance and awareness of environmental impacts are vital to ensuring the longevity and effectiveness of your gutter guard system. By taking proactive steps in care and choosing the right materials, you can significantly extend the life of your gutter guards and maintain their protective qualities over the years.
Final Thoughts
In summary, properly installing and maintaining gutter guards on Klip-Lok® roofs and box gutters is crucial in safeguarding properties against water damage, debris accumulation, and potential fire hazards. As a tradesperson, architect, or builder, your ability to skillfully navigate these installations not only enhances the functionality of your projects but also contributes significantly to their overall aesthetic and longevity.
Remember, the key to successful gutter guard installation lies in attention to detail — from accurate measurement and correct placement to regular maintenance and timely repairs. Embracing these practices will ensure that your gutter guard systems perform optimally year-round, offering peace of mind to your clients and elevating the quality of your workmanship.
Our team at Screen Tech Gutter Guard is here to assist those looking to undertake box gutter projects, whether a residential home or a large-scale commercial building. With our extensive experience and a wide range of high-quality gutter guard solutions, we can help you navigate the complexities of any project.
Don’t hesitate to contact us for expert advice and support on your upcoming box gutter project.
Frequently Asked Questions
Can you install gutter guards on existing gutters?
Yes, you can install gutter guards on existing box gutters. It is easy to install on new homes as the scaffolding makes the installation process easier. However, you can install these systems from the roof with the correct safety measures.
How do I stop my box gutters from overflowing?
To prevent box gutters from overflowing, consider installing gutter guards or gutter mesh covering to keep leaves and other debris out and allow water to flow freely.
Can you install an ember guard to a box gutter?
Yes, you can use the same installation process for ember guard installations to protect against ember attack, keep fine leaves and other debris out and allow water to flow freely.
Are box gutter protection systems better than other gutter guard products?
A box gutter protection system is more effective than other gutter guard products, such as brush gutter guards, foam gutter guards or other metal guards, as they span across the entire gutter.
Can you install it to the gutter’s edge?
Yes, in some cases where the slope is lower than the gutter’s higher edge, installing the mesh to the gutter’s edge provides a better slope that will encourage leaves to fall to the ground and prevent water pooling.
Are box gutter guards suitable for all gutter guard solutions?
Yes, box gutter guards are versatile and suitable for multiple applications. They effectively prevent birds from nesting and block debris like leaves, making them great for leaf-proofing. They offer ember-proofing for areas at risk of bushfires, especially when made of fire-resistant materials. Additionally, they facilitate rainwater harvesting by keeping gutters clear, ensuring cleaner water collection.
Want to know more? ScreenTech sends out Colorbond® gutter guard samples and guides to architects and discusses projects and considerations.
Look no further than ScreenTech’s TuffMesh®, GutterMesh, SteelMesh and SolarMesh products. Our mesh suits Klip-Lok®, Timdeck® corrugated roof types and tiled roofs. Get in touch with a ScreenTech installation partner today.